End to End Deep Learning Tutorial using Azure
Learn how to set up your deep learning workspace, build a custom dataset, train and deploy model with continuous deployment using azure pipelines.
Introduction:
The goal of this article is to set up a deep learning workspace on azure, build and deploy end to end deep learning projects on azure. We will start by building a custom image data set to deploy the model in production. This article is a part of the MSP Developer Stories initiative by the Microsoft Student Partners (India) program.
What will be we’ll be building?
We will build a Pokemon image classifier to classify the awesome starters Pikachu, Charmander, Squirtle, and Bulbasaur.
Live Demo at mini-pokedex.azurewebsites.net
The steps we will follow:
-
Build custom image dataset using Bing image search API
-
Set up our deep learning workspace using azure Data Science VM
-
Build and train model in Azure Data Science VM using fast AI.
-
Build a web app to use our model through API and dockerizing it.
-
Push Docker image of a web app to azure container registry.
-
Deploying web app in Linux container VM from an azure container registry.
-
Setting up continuous deployment using azure pipelines.
Note:
Before you start out, make sure you have an account on Azure with an active subscription. If you are a student in STEM, you may use the Azure for Students to get a subscription for free or else you can use Azure free account.
Step 1: Building custom image dataset using Bing image search api
We will use the Bing Image Search API, go to the Bing Image Search API page and click on Try Bing Image Search and sign in. Then activate your service by filling out the required fields like this:
Give it a name, I named it dataset-search-API, you can try anything different based on its availability. Choose your appropriate subscription. For the pricing tier, F1 will be appropriate as it provides 1,000 transactions free per month. Create a resource group Search-API, you can name it anything, but an important point to keep in mind when working in Azure is to give appropriate names to a resource group, as you would later be using the resource group name to keep track of expenses and delete resources. Select a location for the resource group, accepting the terms and hit create. Then _wait _for your resource to be created. Once it’s created click go-to resource.
 Creating a bing image search resource
-
You would find the API key for your bing image search resource page.
-
Then git clone this repo: image-dataset-bing-API
-
open it in VS Code and create a new file named .env and paste contents of file .env.example into it.
-
Then copy your bing image search API key from your resource page and paste it in the .env file at the appropriate place.
-
Create a virtual environment with: python -m venv venv
-
Activate it using : venv\Scripts\activate.bat (in windows) or source venv/bin/activate (in Linux)
-
Install dependencies using: pip install -r requirements.txt
-
User the script like python search_bing_api.py — query “Bulbasaur”
-
Repeat the above process for Pikachu, Charmander, Squirtle.
-
Now you have a folder called dataset with folders with images of each pokemon.
-
Just go through the images and delete the ones with you feel are not relevant.
-
Add the folder (dataset) to a new git repo as I did here pokemon-image-dataset
Now you have a repo in GitHub with custom image Lets start with the next step:
Step 2: Set up our deep learning workspace using azure Data Science VM
We will set up an NC6 Promo which is a Linux VM with 1 x K80 NVIDIA GPU (1/2 Physical Card) which is 12 GB GPU and six CPU cores.
You can learn more about the VM here.
If you need a detailed installation procedure you can refer fast ai azure page else you can follow below instructions.
-
We will use the template created by the fast ai team to set up the VM: Click this link to take you to the VM creation page.
-
Create a new resource group named DSVM, set the location as your preference.
-
**setup **admin username(make lowercase or Jupyter Hub login will fail with 500 Internal Server Error), and set password
-
Set appropriate VM name, I named it DSVM-DL and select NC6 Promo in VM size
-
Select accept terms and click purchase.
Now wait until the resource is created. Click the notification icon to know if it’s created and click go to resource group when it’s created.
In the resource, group page click on the Virtual Machine with the name you gave it above. And click your public IP as in the image below
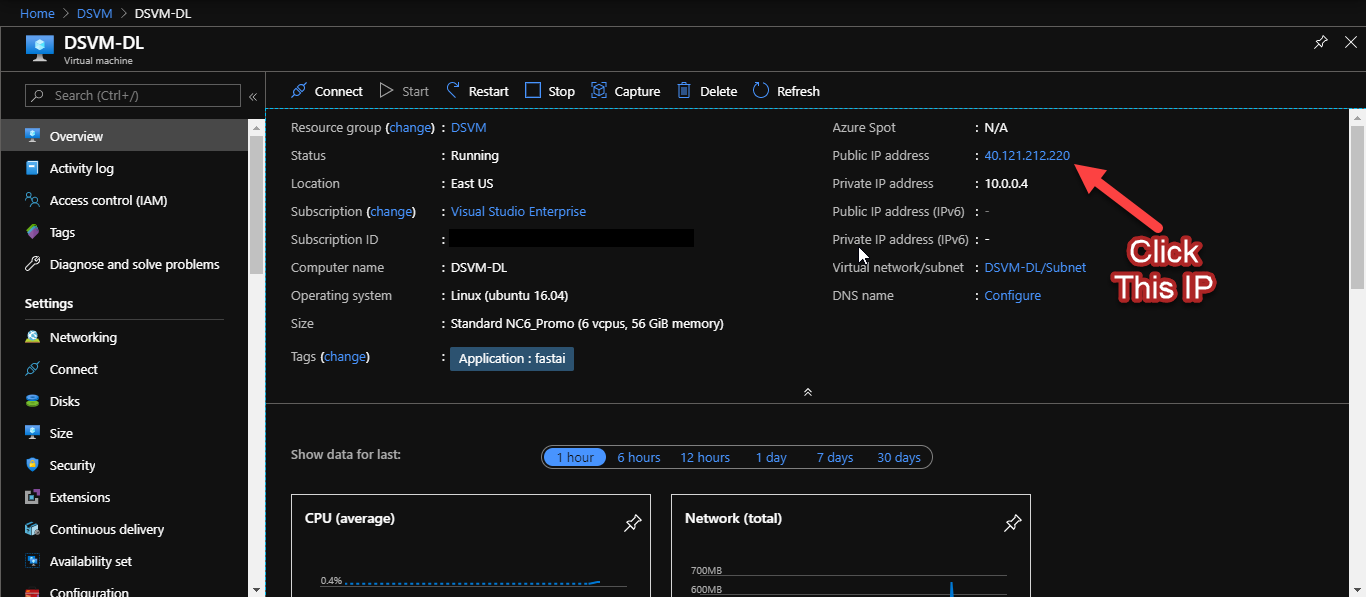 click-the-ip-to-set-it-to-static
Clicking the IP will take you to a Configuration for your public IP, now change the assignment to Static from dynamic, and you can also set a DNS name label.Due to this step, your VM IP will not change after the restart. The page will look like below image
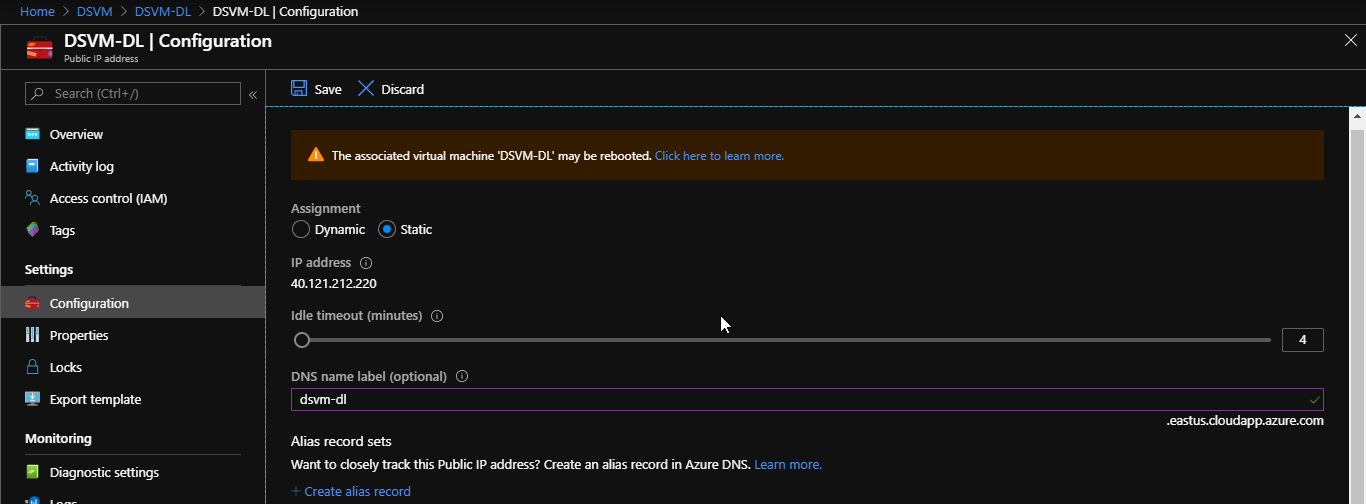 set static IP
Now we have completed setting up the DSVM, let’s move to next step
Step 3: Build and train model in Azure Data Science VM using fast AI.
As you have set up a DSVM with GPU you can either with azure notebooks OR use by ssh into it DSVM and use. I recommend the second method as it gives you more flexibility. First, let me show you the azure notebooks method and then we will start using the VM with SSH.
Using Azure DSVM with azure notebooks.
-
Go to notebooks.azure.com, sign in and create a user id.
-
Then click My Notebooks and Create a New Notebook.
-
Now to use your VM with GPU in an azure notebook, change the option Run on Free Compute to Run on Direct Compute.
-
Now you can begin using the azure notebook on DSVM with GPU.
 The screen on the change compute step
SSH into the DSVM to use from there
This method gives you more flexibility than the above one. For windows users, I recommend using wsl before this step, just type wsl into the current shell to start it.
To connect to your VM use :
ssh <username>@<VM Public IP> and enter passwordSetup Jupyter Notebook and start Jupyter with the commands below
jupyter notebook password
    // Enter password:
    // Verify password:

    jupyter notebook --port 8888
Create a ssh tunnel to localhost:9999 from VM
ssh -L 9999:127.0.0.1:8888 <username>@<VM Public IP>Now go to localhost:9999 to use jupyter notebook, enter a password to start using it.
You can create a folder and make a notebook called pokedex-dl and start working on it.
**Note: **Please refer to pokedex.ipynb to train and export your model to the outputs folder. I’m have explained every step in the notebook if you have any queries regarding it comment below.
After following pokedex.ipynb you would have a outputs folder with the model named poke*predictor*resnet34, download this from the Jupyter notebook. **_Upload the model to dropbox*** and *_get the sharable link**.
Step 4: Build a web app to use our model through API and dockerizing it.
First git clone : pokedex-deploy locally. Replace the dropbox link in server.py with your sharable link. You should also change index.html as per your preference.
You can run pokedex-deploy in docker with
docker build -t poke-image . && docker run --rm -it -p 5000:5000 poke-imageYou can also replace poke-imagewith a image name you like.
Now as we have our docker image ready we can move to next step
Step 5: Push Docker image of web app to azure container registry.
First we need to setup azure CLI, please refer docs.microsoft.com/en-us/cli/azure/install-azure for it. Tip for Windows users:- Try Chocolatey you can refer chocolatey.org/packages/azure-cli for installation.
Don’t forget az login
Now we will create a private container registry using Azure CLI. Container registry is basically a GitHub for docker images, docker hub is a public container registry.
If you need more details of below steps please refer container-registry-get-started-azure-CLI
# create a resource group named container_registry_rg
az group create - name container_registry_rg - location eastus

# create container registry named pokeRegistry
az acr create --resource-group container_registry_rg --name pokeRegistry --sku Basic

# Login to your container registry
az acr login --name pokeregistry

# tag your container registry in following format,
docker tag poke-image pokeregistry.azurecr.io/poke-image:v1

# Push image to container registry, it will take a while
docker push pokeregistry.azurecr.io/poke-image:v1

# You can verify if it's uploaded by
az acr repository list --name pokeregistry --output table

# Important Please don't forget this,important for deployment
az acr update -n pokeregistry --admin-enabled true
Step 6: Deploying web app in Linux container VM from an azure container registry.
Go to Azure at portal.azure.com. and choose to Create a resource, Web, then choose **Web App for Containers **or you can directly click this link to go there.
Hit create and in the page fill the details and create a new resource group. Please change the **Sku and size default option: B1 Basic **in Dev/Test as it will be enough for basic needs. Don’t forget to set the image source as Azure Container Registry in the Docker tab.
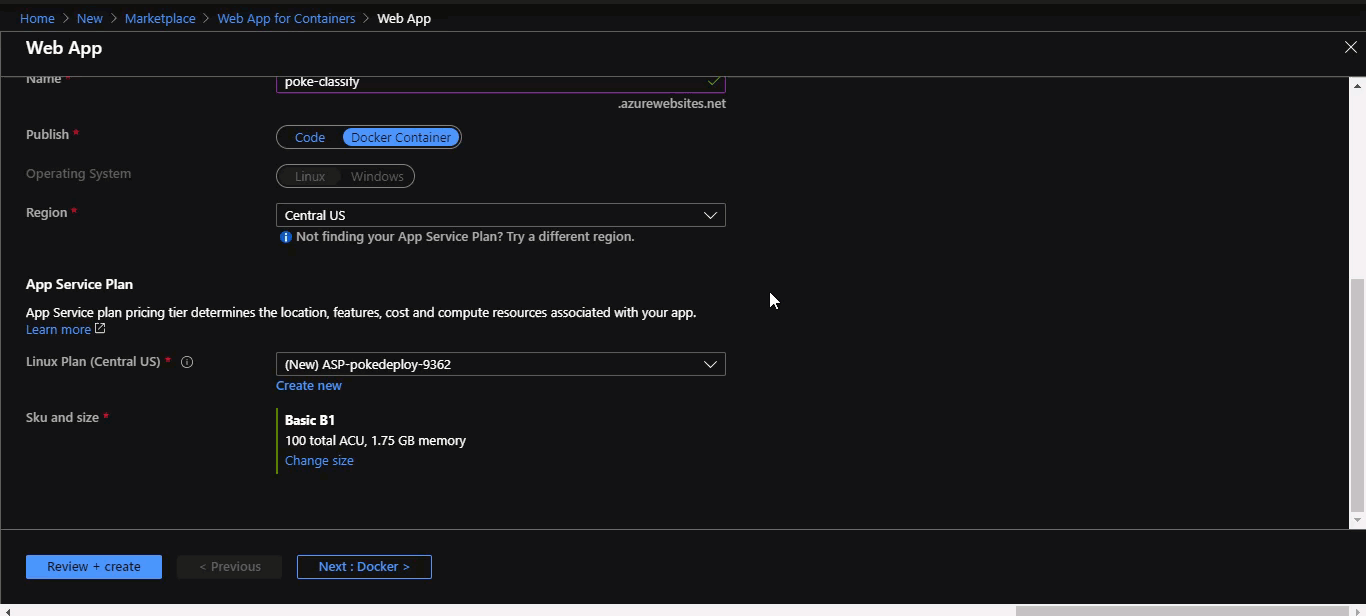 Deploying with Web App for containers
Once it’s completed click on goto resource and you can find your web app URL at URL
Congrats now you have deployed your Deep Learning model 🚀
Step 7: Setting up continuous deployment using azure pipelines.
Now on your web app page in azure, you will find a thing called **Deployment Center, **this is one of the coolest things in azure. It will help us in creating a CI/CD pipeline in Azure.
-
Click deployment center
-
Select Source code location (Github) and Authorize it
-
Select your repository
-
It will automatically detect the docker file, just click next
-
Create Azure DevOps organization and select use Existing in container registry, Click Done
-
Click release pipeline in after it’s the finished page
Above steps can be seen in the gif below:
 deployment center azure
Now you must be in dev.azure.com if not go to it and find your project inside your organization in dev.azure.com.
With the current set up we already have a CI/CD pipeline set up for our project, thanks to Deployment Center.
If you make any changes to your code and push it to GitHub it will build a new image, add it to your container registry and deploy.
But we have two problems to address now
-
just think that you keep making changes to your code and push it, your container registry(10 GB) storage will be used by all those un unused images
-
If you edit your Readme.md it will build a new image and deploy it.
To solve both problems go to your project page inside your organization in dev.azure.com and follow along with the below video.
Wow. Congratulations if you reached here 🎉. If you have any doubts, post them in the comments section.